Morphius/Disassembly
From chromebook hackers wiki
-
 Bottom case w/ marked screws, excuse the stickers ;)
 -
 View inside. Battery screws marked green, motherboard screws marked pink
 -
 Various interesting chips with marked locations
 -
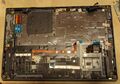 View after removing the motherboard.
 -
 Part number of the keyboard on my morphius
 -
 Closeup of the synaptics TrackPoint board


Opening the case
- Take out the 8 Phillips screws from the bottom case
- Remove the stylus
- Insert a long, sturdy object (screwdriver works :3) into the stylus hole, and pry it open
- Once the first tabs pop off, continue prying off along the longer edge. Case should pop off easily.
TrackPoint button disassembly / reassembly
One of the failure modes of the TrackPoint buttons is a misaligned spring, causing the button to not click at all or click spuriously. The "spring" (in reality, a small metal ring) is attached to the case with poor-quality glue, and it may shift around slightly.
This method doesn't guarantee 100% success due to material fatigue, but it's safer than going in raw:
- start on the top of the button. insert something into the gap between the button and the case (i used my nails xD)
- pry it open evenly (the whole side at once!) - this is to prevent wear/stress
- once it clicks, keep prying from the very center.
- there are more clips on the bottom. continue gently prying towards yourself.
- to get the white leafs out, start on the bottom; with tweezers, try gently prying up starting from the bottom left/right. it should pop off without ANY force.
- once it hinges away upwards, take the upper rail up and while keeping the leaf as low as possible, try pushing it away from yourself. again, this should not require ANY force.
- the leaf should come out. you can service the shitty button assembly now ;)
In my (sdomi) experience, it's often enough to push the ring to the center, so it properly aligns with the plastic shaft from the keycap, and then push the outer rim down in a few spots. Alternatively, one could move the ring and apply a miniscule amount of superglue, but this wasn't required in my case.
Reassembly
- grab the upper metal rail with a pair of tweezers, holding it in a semi-upward position
- get the leafs, insert them under the metal rail, aligning them with the metal holder parts. the holding parts have stems on the *bottom*
- lay them down and slide them onto the metal holders
- using a pincett or other small tool, make sure that the front of the leaf is properly in place
- make sure that the metal rails are pushed towards the center
- take the button cover, aligh it and push on it down firmly until it all clicks in
